Double Sided Kitchen Scrubby – Free Pattern

I love quick and easy projects. These scrubbies would be great to sell at craft shows or to give as gifts. They work up in no time at all and take very little yarn, so they are great for scraps.

Materials:
Cotton yarn (I used Bernat Handicrafter Cotton in Squishy)
Red Heart Scrubby Sparkle Yarn
Size H 5.0mm Hook
Size I 5.5mm Hook
Yarn Needle

Stitches/Abbreviations:
CH – chain
SC – single crochet

Pattern Instructions:

Square #1:
Using Scrubby Sparkle yarn and the I 5.5mm hook, ch 13
Row 1: sc in the 2nd ch from hook and across the row (12 stitches)
Rows 2-12: sc across
Fasten off and weave in ends

Square #2:
Using cotton yarn and the H 5.0mm hook, ch 13
Row 1: sc in the 2nd ch from hook and across the row (12 stitches)
Rows 2-12: sc across
Do not fasten off.

Assembly:
Line up your two squares with the cotton square closest to you.
Ch 1 and single crochet around the edges of the two pieces to join them together. 3sc in each corner to turn. Once you’ve gone the whole way around, fasten off and weave in the end.

It’s that simple!

Ribbed Floret Earwarmer – Free Pattern

Instead of working on my WIPs, I’ve been playing around with different stitches and attempting to come up with combinations that look good. I decided to start with earwarmer patterns, since most of the country is colder than Antarctica at the moment! This pattern is a combination of floret stitches and back and front post double crochet. It’s fairly simple and it works up very fast. Enjoy!

Materials:
H 5MM Hook
Worsted Weight Yarn (approx 50 grams)
Tapestry Needle

Stitches/Abbreviations:
CH: Chain
SL ST: Slip Stitch
DC: Double Crochet
BPDC: Back Post Double Crochet
FPDC: Front Post Double Crochet

Pattern

Chain 17

Row 1: DC in the 4th chain from hook and DC across the chain. The three CH you skip at the beginning counts as a DC. (15 stitches)

Row 2: Chain 1 (counts as a SL ST), *DC in the next stitch, SL ST into next stitch. Repeat from *. The last SL ST will be in the top of the turning chain.

Row 3: Ch 3 (counts as 1 DC), *DC in the next DC, DC in the next SL ST. Repeat from *. The last DC will be in the top of the turning chain.

Row 4: Ch 3 (counts as 1 DC), BPDC around the second DC (remember that the turning chain counts as the first DC), DC in the top of the next DC, *BPDC around the next DC, DC in the top of the next DC. Repeat from *. The last DC will be in the top of the turning chain.

Row 5: Ch 3 (counts as 1 DC), FPDC around the second DC (remember that the turning chain counts as the first DC), DC in the top of the next DC, *FPDC around the next DC, DC in the top of the next DC. Repeat from *. The last DC will be in the top of the turning chain.

Repeat rows 2 – 5 until your earwarmer is the desired length.

Whip stitch the ends together being careful to match up each stitch, so the seam isn’t too noticeable.

Tutorial: http://newstitchaday.com/how-to-crochet-the-whip-stitch-seam/

I stopped after 49 rows (on a row 5), and I liked the way the seam looked.

Cabled Headband – Free Pattern

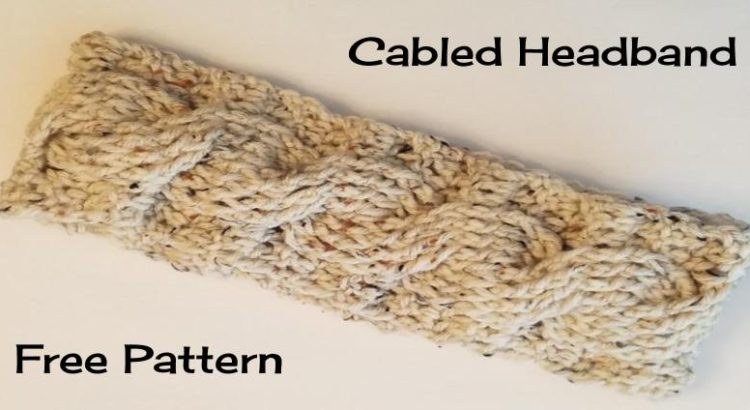
Not too long ago, a friend of mine asked me to make her an earwarmer/headband. Of course, the picture she found was of a knitted headband. I figured I’d be able to find a similar crocheted version, but after scouring Pinterest and Ravelry, I realized that I was out of luck. There were a couple patterns for crocheted cabled headbands, but they looked nothing like what she wanted. I started watching tutorials on how to crochet cables and studied the patterns that were out there, and came up with this! My first pattern.

Cabled Headband

Materials:

  • I/9 5.5MM Hook
  • Worsted Weight Yarn (I used Red Heart Super Saver Aran Fleck)
  • Tapestry Needle

Stitches/Abbreviations:

  • CH: Chain
  • DC: Double Crochet
  • BPDC: Back Post Double Crochet
  • FPDC: Front Post Double Crochet
  • FPTC: Front Post Triple Crochet

Pattern:

Chain 16

Row 1: DC in the 2nd chain from hook and DC across the chain (14 stitches)

Row 2: Chain 2 (counts as first stitch, so it looks like you’re skipping the first stitch), DC in the next two stitches, BPDC in the next 8 stitches, DC in the next 3 stitches. The last stitch will be in the top of the turning chain.

Row 3: Ch 2, DC in the next 2 stitches, Skip four stitches, FPTC around the next four stitches. Go back and FPTC around the skipped four stitches. DC in the last three stitches

Row 4: Ch 2, DC in the next 2 stitches, BPDC around the next 8 stitches, DC in the last three stitches.

*** Rows 3 & 4 can get tricky. This is the tutorial from The Crochet Crowd that I used to help me figure it out!

Row 5: Ch 2, DC in the next 2 stitches, FPDC around the next 8 stitches, DC in the last three stitches.

Row 6: Ch 2, DC in the next 2 stitches, BPDC around the next 8 stitches, DC in the last three stitches.

Repeat rows 3 – 6 until your headband is the desired length. Mine are usually a total of ten cables. I find that the seam looks less noticeable if you end after row 5.

Whip stitch the ends together being careful to match up each stitch, so the seam isn’t too noticeable. (Whip Stitch Seam Tutorial from New Stitch A Day)

Let me know if you see any problems with this pattern. It’s the first I’ve posted!

Click HERE for a printable version!

Feel free to sell what you make from this pattern. All I ask is that if you post anything online, give me some credit/love with a link to the pattern/blog post!